Jacob Butler's Joinery Workshop: Woodwork Tips
Freehand Honing and Sharpening for Chisels and Plane blades.
For latest news, some links and recent comments go to bottom of page.
I was never really taught how to sharpen. We were merely shown double-sided oil stones and told about the magic 30 degree angle and the 'burr'. Later we were pointed at bench grind stones, told about the secondary bevel of 25 degrees, and warned about 'blueing' - softening the steel by over heating.
It isn't easy at first, and to serve the booming DIY and novice market there has been an explosion of magazine and website articles, and an ever increasing range of aids and accessories.
Google 'sharpening planes and chisels' and you will see!
Excellent woodwork was done in the past, but in older books the only sharpening kit regarded as essential was the oil stone. The grindwheel was useful if you had access to one - but not essential. The old chaps obviously knew how to do it!
But how did they sharpen chisels and planes, with just a stone, some oil and a few rags?
Why should we bother anyway, with all the help available from modern gadgets and systems?
Well I can assure you that it is most definitely worth the effort, for these reasons:
- Quick, easy and effective.
- The easiest method for a novice to learn.
- Requires the least amount of kit.
- Better for your tools - they don't get out of shape and don't have to be re-ground.
- You will find that you are working with sharp tools for more of the time and the quality of your work will improve.
- Just one 'combined' bevel. No more primary and secondary - they are too difficult to do freehand and don't serve any purpose.
- The bevel is kept in perfect shape all the time and never needs re-grinding.
- The action is fairly vigorous and fast so you are back on the job quickly. No point in hanging about, this technique is for busy woodworkers, not sharpening enthusiasts.
- No jigs required
- No need to flatten stones
- Freehand sharpening lets you use a finer grit and get a keener edge for the same amount of effort.
How is it done? The 'convex bevel' and the 'dip'. Rounding 'under'.
I should say straightaway that what I'm describing sounds very much like the dreaded 'rounding over - which must be avoided at all costs'.
It could make it easier to think of my method as 'rounding under' - rounding yes, but from the desired edge angle to lower angles.
The basics of sharpening are described at great length on the net. One of the best descriptions is on the Museum of Woodworking Tools site. I recommend reading this first. You need to understand particularly about the "burr" or "wire edge".
The method I describe differs from theirs in various ways, particular the forming of a convex bevel by 'dipping' the handle, instead of aiming for a flat bevel.
Then have a look at Richard Jone's 'Lesson in Sharpening'
Terms: Sometimes the flat side of the chisel or plane blade is referred to as "the back"and the bevelled side as "the face". I prefer the other convention: flat side = "face", bevelled side = "back". This strikes me as more logical.
The method:
Ordinary chisels and plane blades are sharpened in much the same way. The most commonly preferred angle is about 30 degrees. It need not be spot on but it is important to keep the angle close to 30 deg and to avoid the tendency to speed up the process by increasing the angle.
The minimum kit needed is a double-sided oil stone, some thin oil or white spirit, and a few rags. This is ALL you really need but the process can be refined with a few extra items.
1. If you already have an edge in good order which just needs a bit of honing:
Start on the fine side of the stone, well charged with oil at all times.
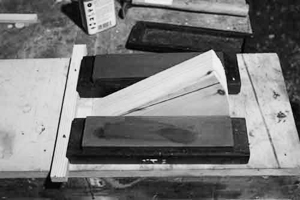
The chisel or plane blade is worked energetically up and down on the oiled stone, being held so that as near as possible it doesn't exceed 30 degrees. A visual aid such as the wedge shown below can help you keep close to the angle. It is cut at 30 degrees and marked at 25
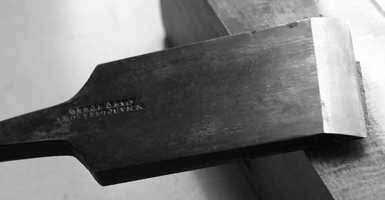
It is essential that the handle is dipped as you go, so that the honing angle is reduced during each stroke. This produces a rounded or convex bevel but with an edge at 30 degrees as in the picture below. This is a large 63mm chisel making it easier to see. It would take many sharpenings to get to this whole convex bevel, if your starting point is a chisel sharpened in the ordinary way with a primary and secondary bevel.
But there is no hurry! It may look a bit odd when you have a convex bevel started on top of a hollow ground edge, but it will cut perfectly well.

The convex bevel can be honed vigorously with as much force as you can muster, which makes the process quicker than if you were carefully trying for a flat bevel. Start with the chisel at about 30 degrees and finish at an unspecified lower angle with the heel on the stone and the edge lifted off:
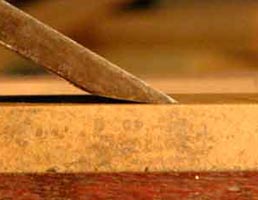
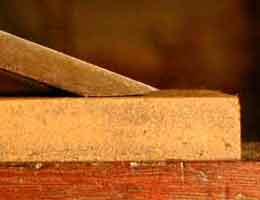
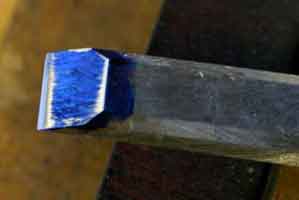
The last picture above is of a newish chisel which has been honed a few times only.
The blue shows the original 25 degree grind marks which the chisel came with, as yet untouched. The rounded bevel has not yet developed and only touches at the edge and the heel. It will take many honings before it looks like the big chisel in the picture above, but there is no hurry - it's the edge that is important, not the bevel. NB This chisel is an Axminster cheapy, but it sharpens perfectly well.
The big chisel above has a fully developed convex bevel, but only because it was reground to remove a nick, otherwise it would have taken many honings and many hours of use, to get that far.
It is essential that the angle is not lifted above 30 degrees. This is the hardest part for a beginner but it becomes quite easy with only a little practice, and in any case does not need to be exact - a few degrees out will not make much difference.
The hardest part for an experienced tool sharpener is getting used to the idea of a convex bevel; all the advice is to avoid this like the plague and go instead for flat to hollow ground!
To even-out wear and get a straighter edge it is necessary to try to use the whole area of the stone and also change direction and angle across the stone. if the stone is hollow you need to make sure that the whole edge is honed by trying different directions e.g, short stabs across the stone, or from end to end but skewed.
If not too blunt, a wire edge will come up quickly, which you can feel if you slide a finger over the edge, off the face i.e. avoid a cutting action! Wipe off all oil first - it is best to keep it off your hands.
When you can feel (or see) a wire edge or burr along the whole of the edge then you turn the chisel flat on to its face and take off the wire edge by rubbing the chisel around (in a circular motion) - keeping the face firmly held flat on the stone.
This may turn the wire edge back to the bevel side in which case you hone again but gently so that the new wire edge is taken off or turned back to the face side.
If you want a very sharp edge you repeat the two steps: hone the bevel and flatten the face, several times - but taking less time and using less pressure with each step, so that you are turning/removing a finer wire edge each time until it falls away or is easily removed by light stropping.
If a wire edge doesn't come up promptly in a few seconds you probably have:
2. An blunt edge which needs a bit more than just honing:
You need to back-off more of the bevel on the coarse (faster) stone so you repeat the process exactly as above but at a shallower maximum angle, usually 25 degrees, dipping as above, to produce a rounded bevel but without necessarily reaching the edge.
Then move back to the finer stone and try again for the wire edge as in part 1.
You may have to repeat these steps several times if the chisel was badly out of shape or very blunt.
3. An edge damaged or in very poor condition:
You could grind this back as in 2 above, if necessary going right to the edge or past it to remove chips and nicks. One big advantage of the convex bevel approach is that it is faster than trying for a flat bevel freehand - you don't need to be quite so cautious and so can put more energy into it. Freehand is much faster than using a honing jig as a the downwards pressure is on to the edge and not on to the wheel of the jig.
This is a great advantage, as more tools are spoiled by overheating on a grindwheel, than any other way, and power grinding can be thing of the past.
Nevertheless if it really is too slow for you, you may need to resort to the power tool.
I find a belt sander to be ideal. You grind as necessary, close to 30 deg but dipping as above in part 2, for a convex bevel. It runs a lot cooler than a bench grinder so avoiding over-heating. It may be the convex bevel which keeps it cooler, as the point of contact keeps changing as you dip, and having a smaller area in contact helps the grit to cut rather than rub
Having re-shaped the edge and removed nicks, it's back to honing as in 1 above.
Conventional systems emphasise flattening and polishing the face of a new tool. If flattening really is necessary then you should return it to the shop if you can. Improving performance by the application of candle wax is much more effective than hours of polishing. Rub a candle over the face of a chisel or the sole of a plane.
A little less than perfectly flat/polished is usually OK in woodworking terms and in any case will gradually disappear over time, and the occasional nick in the cutting edge can usually be lived with if the alternative is hours of polishing, and will eventually be removed by subsequent honing.
The best way to flatten and polish faces is to use the tool a lot.
Flat Stones
There is really no need to flatten stones for freehand sharpening. A camber is desireable anyway, on most edges, or harmless at least.
But some planes such as a shoulder plane, need a straight edge. If your stone is too hollow then the "Scary Sharp" method; honing on emery paper on a flat surface, is the easiest, and the free-hand convex bevel principle works just as well here, with the same advantages.
Notes
I don't claim this method as my own; I think I am describing how it was done before everybody got confused by modern systems and the obsession with angles and flat bevels.
One double-sided stone will do, but I have three, more by chance than choice. One is a natural stone with very fine grit the same on both sides. This gives me five grit sizes altogether.
With a honing jig I used to find the very-fine almost unuseable, for two reasons:
First, the cutting edge and the stone surface have to be aligned perfectly; the edge has to be ground in to match the stone, the finer the grit the harder this is to do.
Second, the downwards pressure on a jig is shared with the wheel, and hence reduced, so it all takes longer.
These problems are avoided by not using a jig. Freehand sharpening lets you use a finer grit and get a keener edge for the same amount of effort.
In practice I find it most effective to reserve the finest stone for smaller chisels (say 10mm or less), the next for up to 25mm and the next for plane blades. No need to change down grits whilst honing unless you really want a 'scary sharp' finish, which will take a little longer. The two coarser grits remain for grinding.
Since I discovered the method my tools have been sharper than they ever were before. The method is so quick and easy that there is no need to put up with a dull edge for a second.
Latest news and comments. May 2010.
Since I wrote the above I have actually sharpened a lot of stuff, including bringing old edges back from the dead, and am even more convinced that it is the way to go, for a woodworker that is. If you are a surgeon or just a sharpening fetishist you could go further!
I have been intending to produce some better photos but in the meantime Steve Branam has done a fine job describing the process on his blog and his video demonstrates 'the dip' really well.
http://www.closegrain.com/2010/04/grimsdale-method.html
There are parts 1,2 and 3 so far. Some aspects of his approach are slightly more complicated than mine, I'm more of a minimalist.
I've also come up with a jig, which may seem contradiction but it's more of a holding device or handle. You can see it here (scroll down for the MKII version!)
Other interesting links;
Marcus Sly says freehand honing is good for you (and your woodwork).
http://www.beautifulwood.co.uk/blog/tag/sharpening
Stephen S Sheperd reminds us that grindstones are bad for you;
http://www.fullchisel.com/blog/?p=998
L Williams doesn't agree
There are arguments on various message boards (sometimes not for the faint hearted!) :
http://www.sawmillcreek.org/showthread.php?t=138994&highlight=rounded+bevels
http://forums.finewoodworking.com/fine-woodworking-knots/hand-tools/rounded-bevels
http://www.forums.woodnet.net/ubbthreads/showthreaded.php?Cat=&Number=4854246&page=0&view=collapsed&sb=5&o=
http://www.ukworkshop.co.uk/forums/experimenting-with-the-grimsdale-method-t41258.html
http://www.woodworkuk.co.uk/forum/viewtopic.php?f=5&t=4514
As a footnote I couldn't resist referring to something from my dim and distant student days, namely Occam's Razor - a rule for sharpening thought processes, not chisels, but which works for both. The rule is written in various ways but "avoid unnecessary multiplication of entities" will do. In other words; keep it simple, with as few accessories as possible. For most purposes one double sided stone will do everything.
top of page